First Coast Rigs, Jigs, Lures & Knots

Proven rigs, jigs, lures, and knots.

These practical starting points cover the surf, inlets, creeks, St. Johns River, Intracoastal, jetties, lakes, ponds, and nearshore waters. Match size, weight, color, and retrieve to the forage, depth, current, cover, and fish you expect.

Creeks, Flats & ICW

Inshore rigs

Reliable choices for redfish, seatrout, flounder, black drum, and sheepshead.

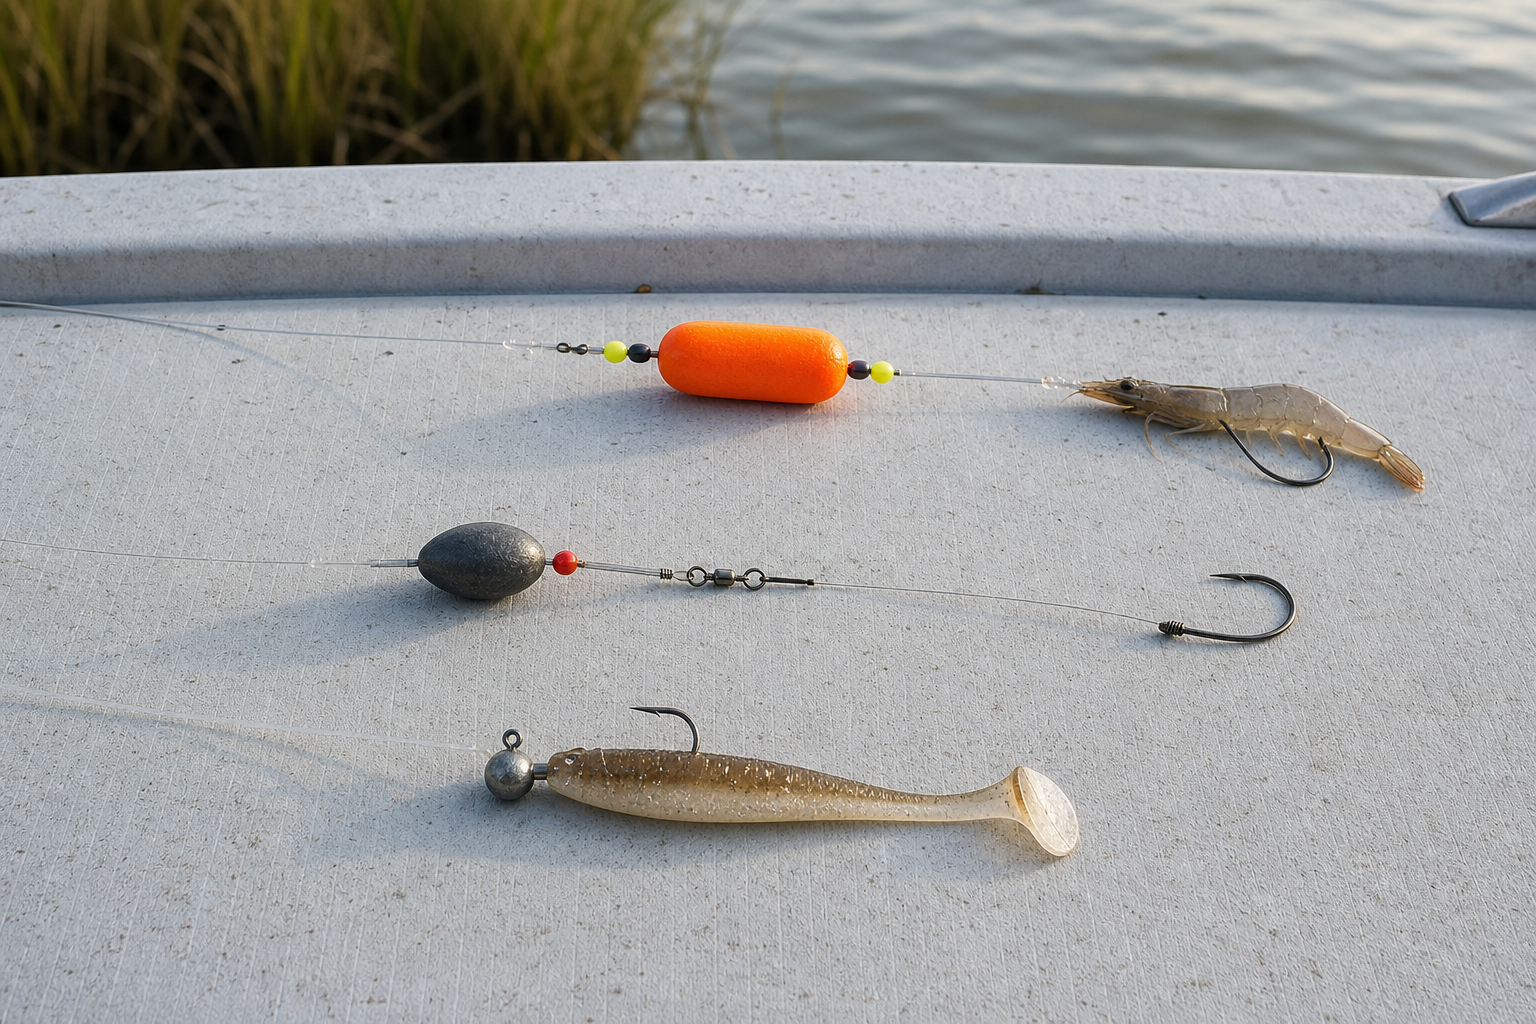
Photorealistic popping cork, fish-finder rig, and paddle-tail jig arranged on a boat deck
Suspended bait

Popping Cork Rig

A noisy cork draws fish toward a live shrimp or mud minnow suspended below it. It excels on grass flats, creek mouths, and stained water.

Targets
Trout, redfish, flounder
Build
Cork, 18–36 in. leader, 1/0–3/0 circle hook
Tip
Pop twice, then let the bait settle.
Bottom rig

Carolina / Fish-Finder Rig

An egg sinker slides above a swivel so a shrimp, mullet, or crab can move naturally along shell, channel edges, and dock structure.

Targets
Redfish, drum, flounder
Build
Egg sinker, swivel, 18–30 in. leader, circle hook
Tip
Use only enough weight to hold bottom.
Artificial

Paddle-Tail Jig

A 3–4 inch baitfish-colored paddle-tail on a jig head covers water and can be swum, bounced, or slow-rolled through nearly any inshore habitat.

Targets
Trout, redfish, flounder, snook
Weight
1/8–3/8 oz. for most local water
Tip
Keep the hook centered so the bait runs true.
Structure rig

Sheepshead Knocker Rig

A compact egg sinker rests directly above the hook, keeping a fiddler crab or shrimp tight to bridge pilings, rocks, and jetty structure.

Targets
Sheepshead, black drum
Build
Small egg sinker, short leader, #1–1/0 hook
Tip
Lift at the first steady pressure.

Beaches & Inlets

Surf rigs

Built to cast cleanly, hold in moving water, and keep bait in the feeding zone.

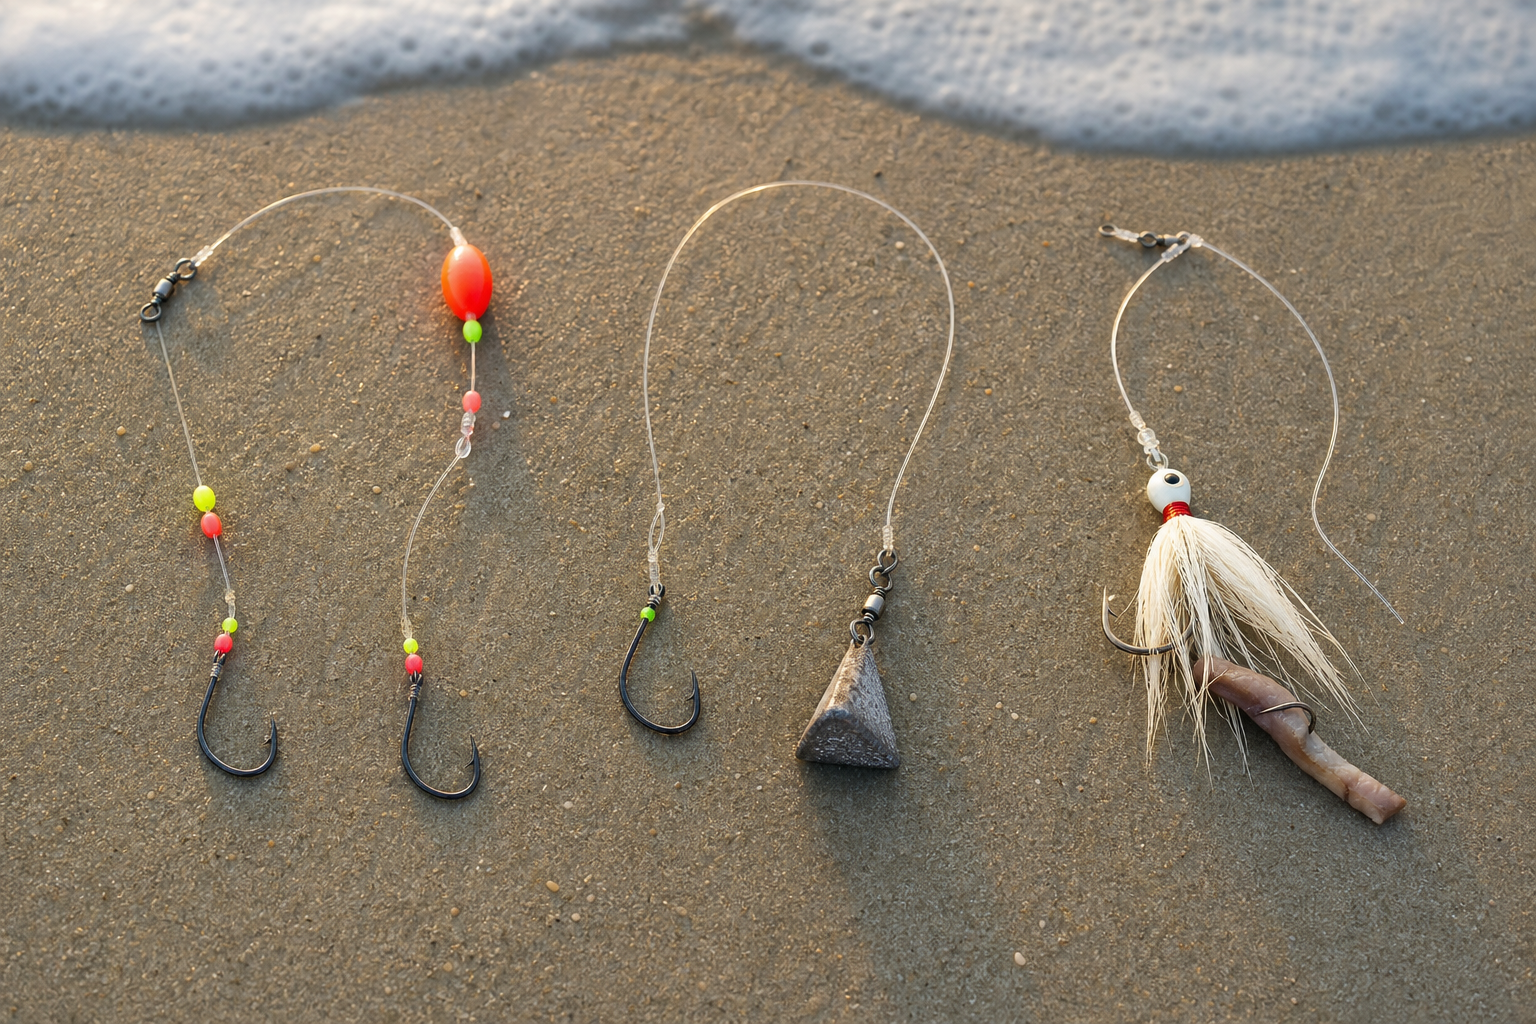
Photorealistic pompano rig, surf fish-finder rig, and bucktail jig arranged on wet beach sand
Two-hook surf rig

Pompano Rig

Two short dropper leaders with small circle hooks and floats keep sand fleas, shrimp, or clam visible above the bottom.

Targets
Pompano, whiting
Build
1/0 circle hooks, small floats, pyramid or sputnik sinker
Tip
Fish the first trough before casting long.
Sliding surf rig

Surf Fish-Finder Rig

A sliding sinker clip lets larger bait move naturally while a pyramid sinker holds in the wash. It is ideal for cut mullet and larger shrimp.

Targets
Redfish, bluefish, drum
Build
Sinker slide, swivel, 18–36 in. leader, 2/0–6/0 circle hook
Tip
Shorten the leader in rough surf.
Casting jig

Bucktail Jig

A compact bucktail casts through wind and works around inlets, troughs, and jetty current. Tip it with shrimp or a narrow strip of bait when bites are slow.

Targets
Flounder, pompano, redfish, bluefish
Weight
1/2–2 oz., matched to current
Tip
Hop it just above the sand or rocks.

Bait, Bottom & Tandem Presentations

Specialty rigs

Useful setups for catching bait, fishing two depths, presenting natural bait on bottom, and covering water with paired lures.

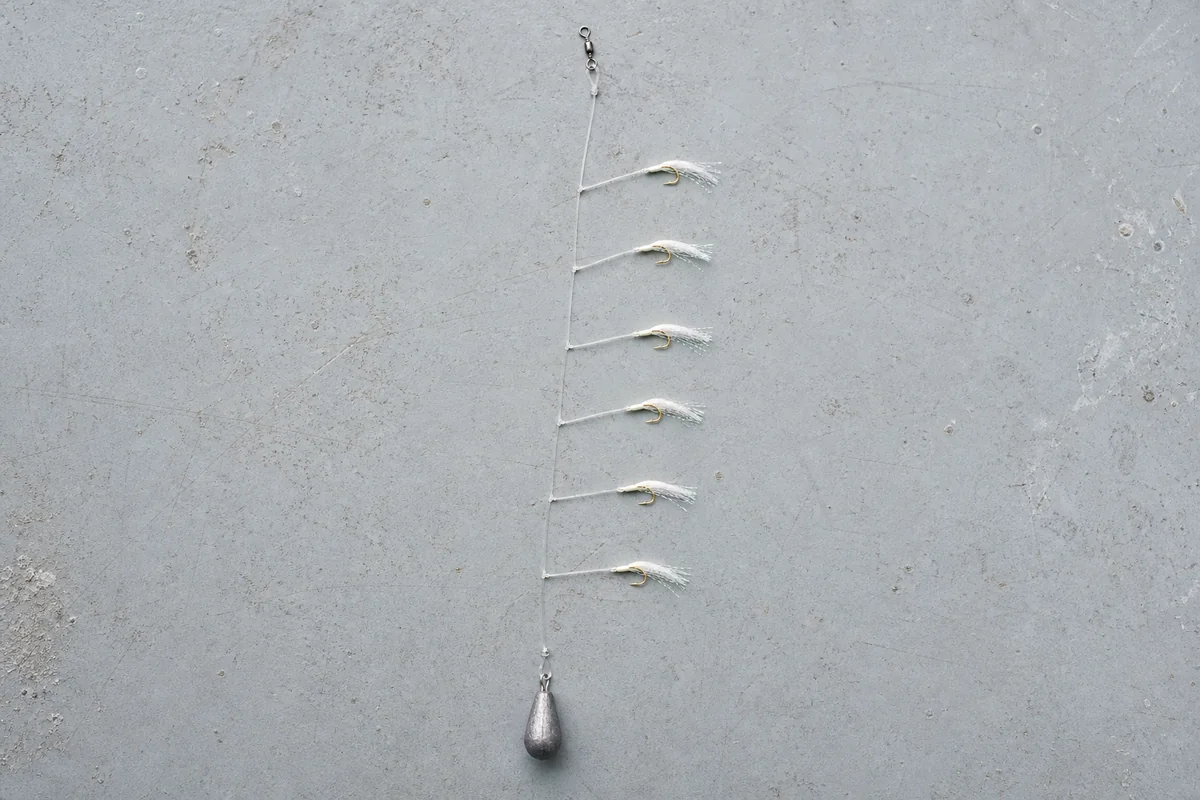
Complete six-hook Sabiki rig with dressed hooks, top swivel, and bottom sinker Bait-catching rig

Sabiki Rig

A vertical string of tiny dressed hooks imitates a school of small forage. Lower it into marked bait schools, around bridge shadow lines, or beside channel markers to collect live bait.

Targets
Threadfin herring, scaled sardines, cigar minnows, and other small baitfish
Build
Top swivel, 4–6 dressed branch hooks, light sinker at the bottom
Tip
Lower straight down and jig gently; avoid casting the many exposed hooks.
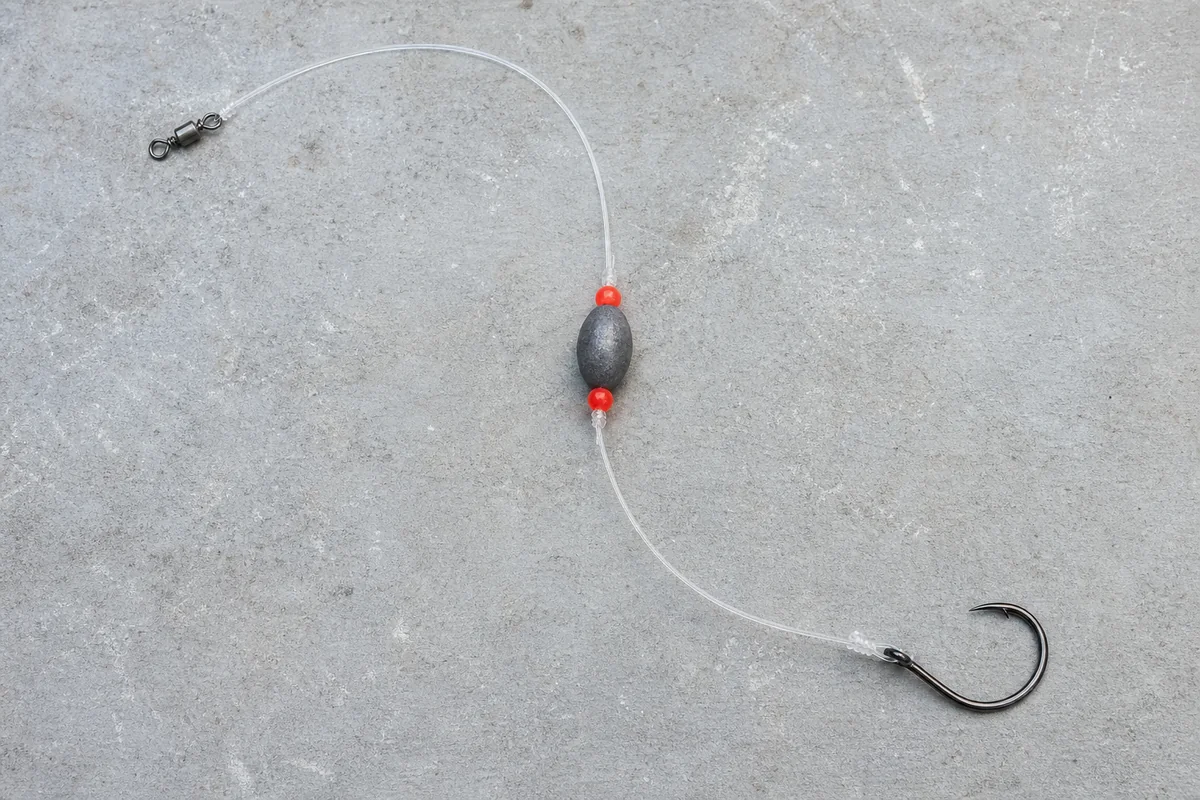
Single-hook Gulf rig with barrel swivel, egg sinker, red beads, and circle hook Simple weighted leader

Gulf Rig

A ready-to-fish single-hook leader carries an egg sinker between protective beads. It is compact, casts easily, and keeps shrimp, cut bait, or crab close to bottom.

Targets
Redfish, black drum, catfish, sharks, and other bottom feeders
Build
Barrel swivel, weighted mono leader, beads, one circle hook
Tip
Match the hook and sinker to the bait and current; lighter is better when it still holds.
Hi-Lo rig with two dropper-loop hooks above a pyramid sinker Two-level bottom rig

Hi-Lo Rig

Two dropper-loop hooks sit at different heights above the sinker, letting you test two baits or two positions in the water column while keeping both leaders short and tangle resistant.

Targets
Whiting, pompano, croaker, spot, and black sea bass
Build
Top swivel, two dropper loops, two hooks, bottom sinker clip
Tip
Use short droppers and streamlined baits when casting through wind or surf.
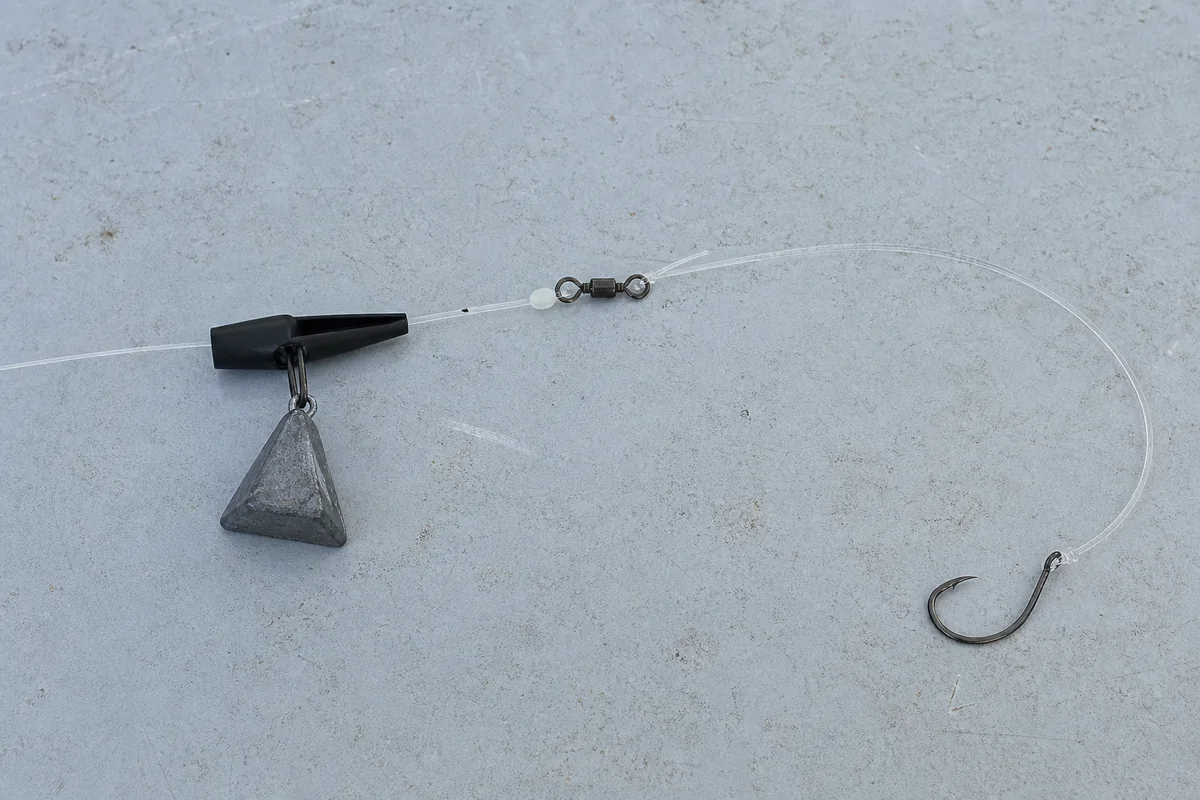
Fish-finder rig with sinker slide, pyramid sinker, bead, swivel, leader, and circle hook Sliding-weight rig

Sinker-Slide Rig

The main line runs through a sinker slide before reaching a bead and swivel. A fish can move off with the bait while the sinker remains planted, making this a versatile fish-finder setup.

Targets
Redfish, black drum, bluefish, sharks, and larger surf fish
Build
Sinker slide and clip, bead, swivel, 18–36 in. leader, circle hook
Tip
Use a pyramid or Sputnik sinker in surf and shorten the leader when seas are rough.
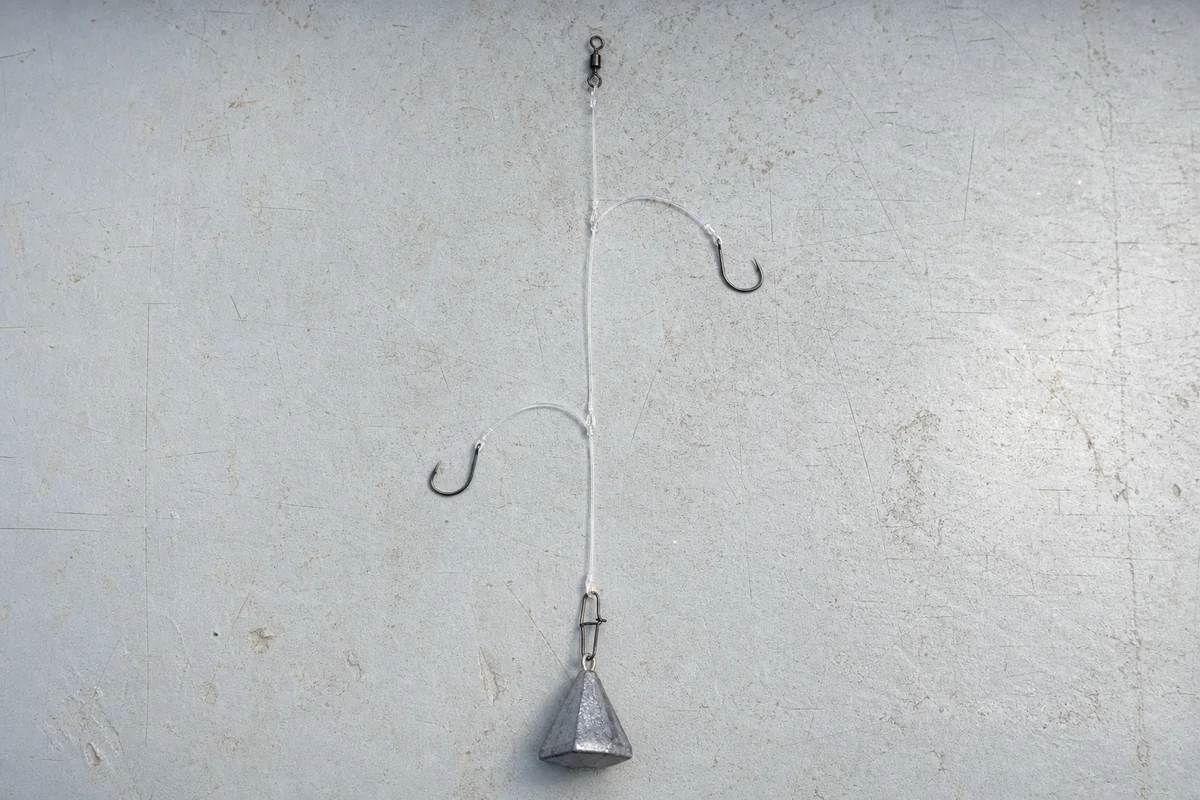
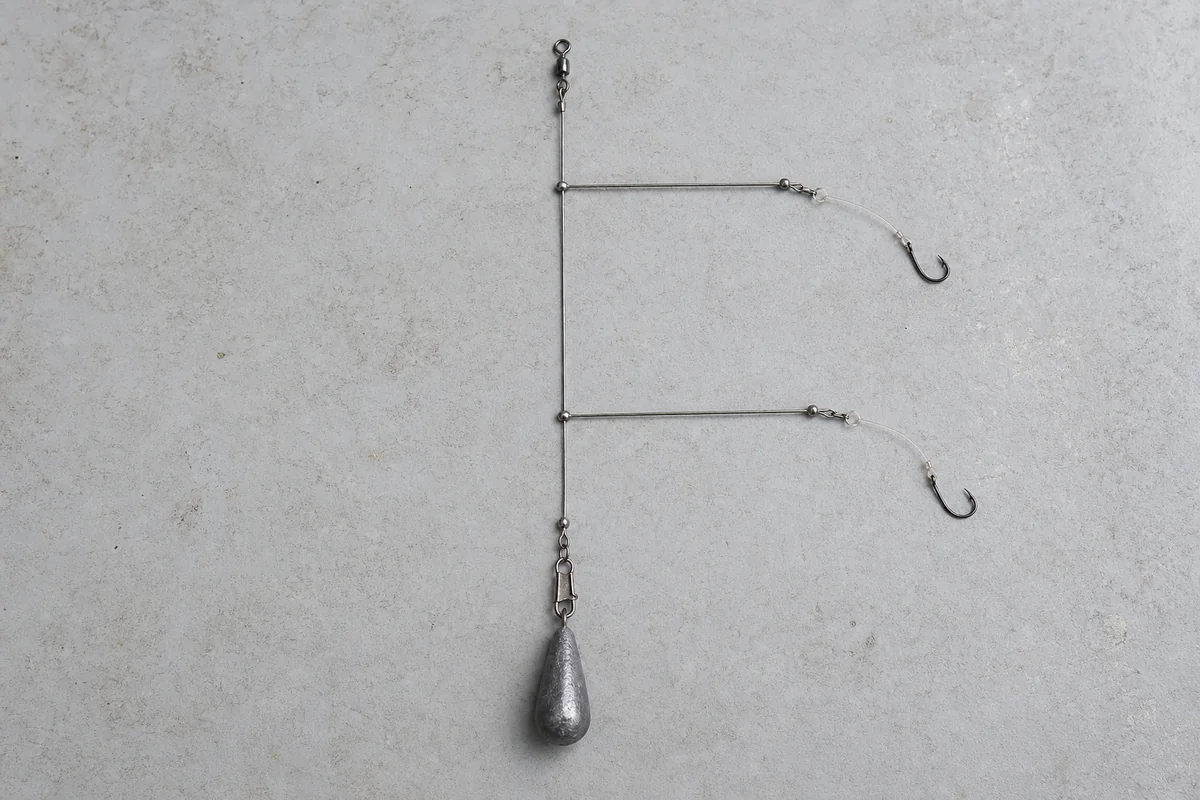
Wire-spreader top-and-bottom rig with two hook arms and a bottom bank sinker Wire-spreader bottom rig

Top-and-Bottom Rig

A wire or heavy-filament spine supports two separate hook arms with the sinker at the bottom. The spreader-style version shown keeps baits apart and is easy for new anglers to bait and lower.

Targets
Croaker, spot, whiting, catfish, and black sea bass
Build
Top swivel, two spreader arms and leaders, bottom sinker clip
Tip
Best for vertical fishing from boats, docks, and piers; lower it smoothly to prevent tangles.
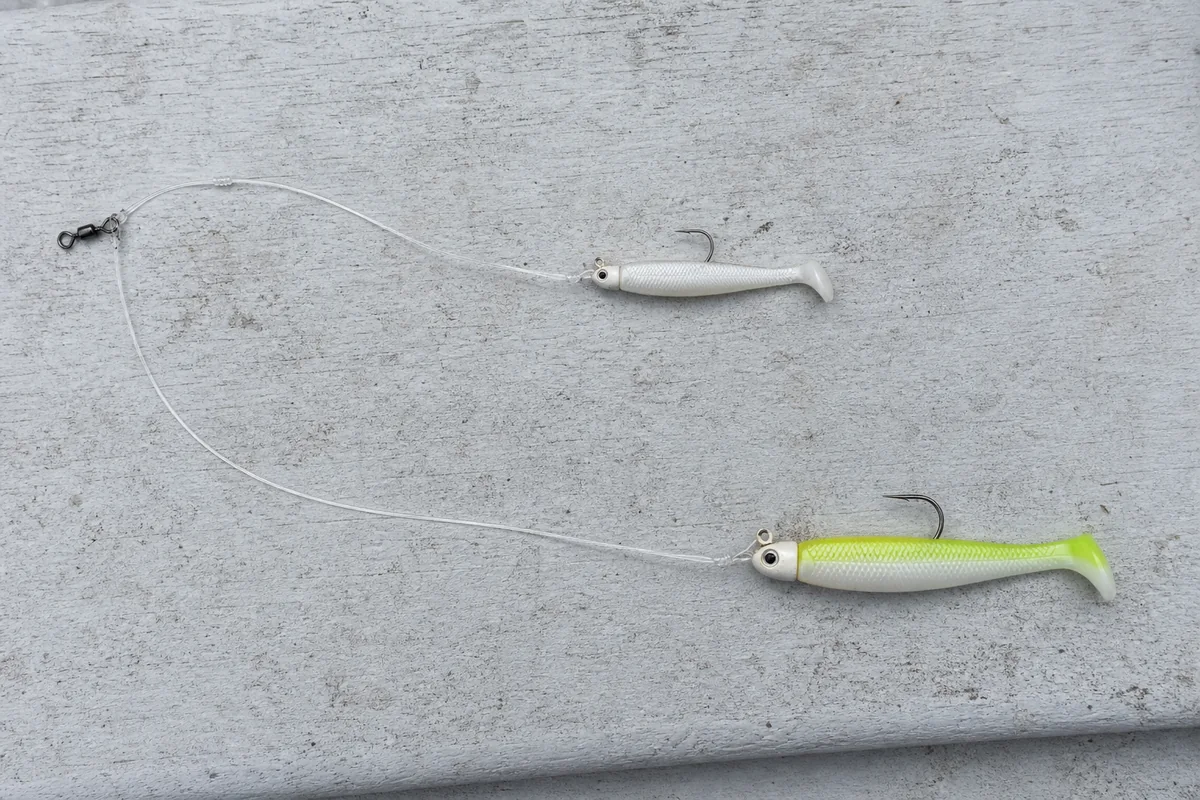
Tandem rig with two paddle-tail jigs on a short leader and a longer trailing leader Two-lure presentation

Tandem Rig

Two jigs or soft plastics on unequal leaders imitate separated baitfish and cover slightly different depths. It can trigger schooling fish and helps reveal the productive color or size.

Targets
Spotted seatrout, Spanish mackerel, bluefish, and schooling freshwater fish
Build
One short dropper, one longer trailing leader, two single-hook jigs
Tip
Keep the leaders unequal and use a smooth retrieve to reduce fouling.

Saltwater & Freshwater

Useful First Coast jigs

Choose weight before color: the lightest jig that maintains contact usually looks the most natural.

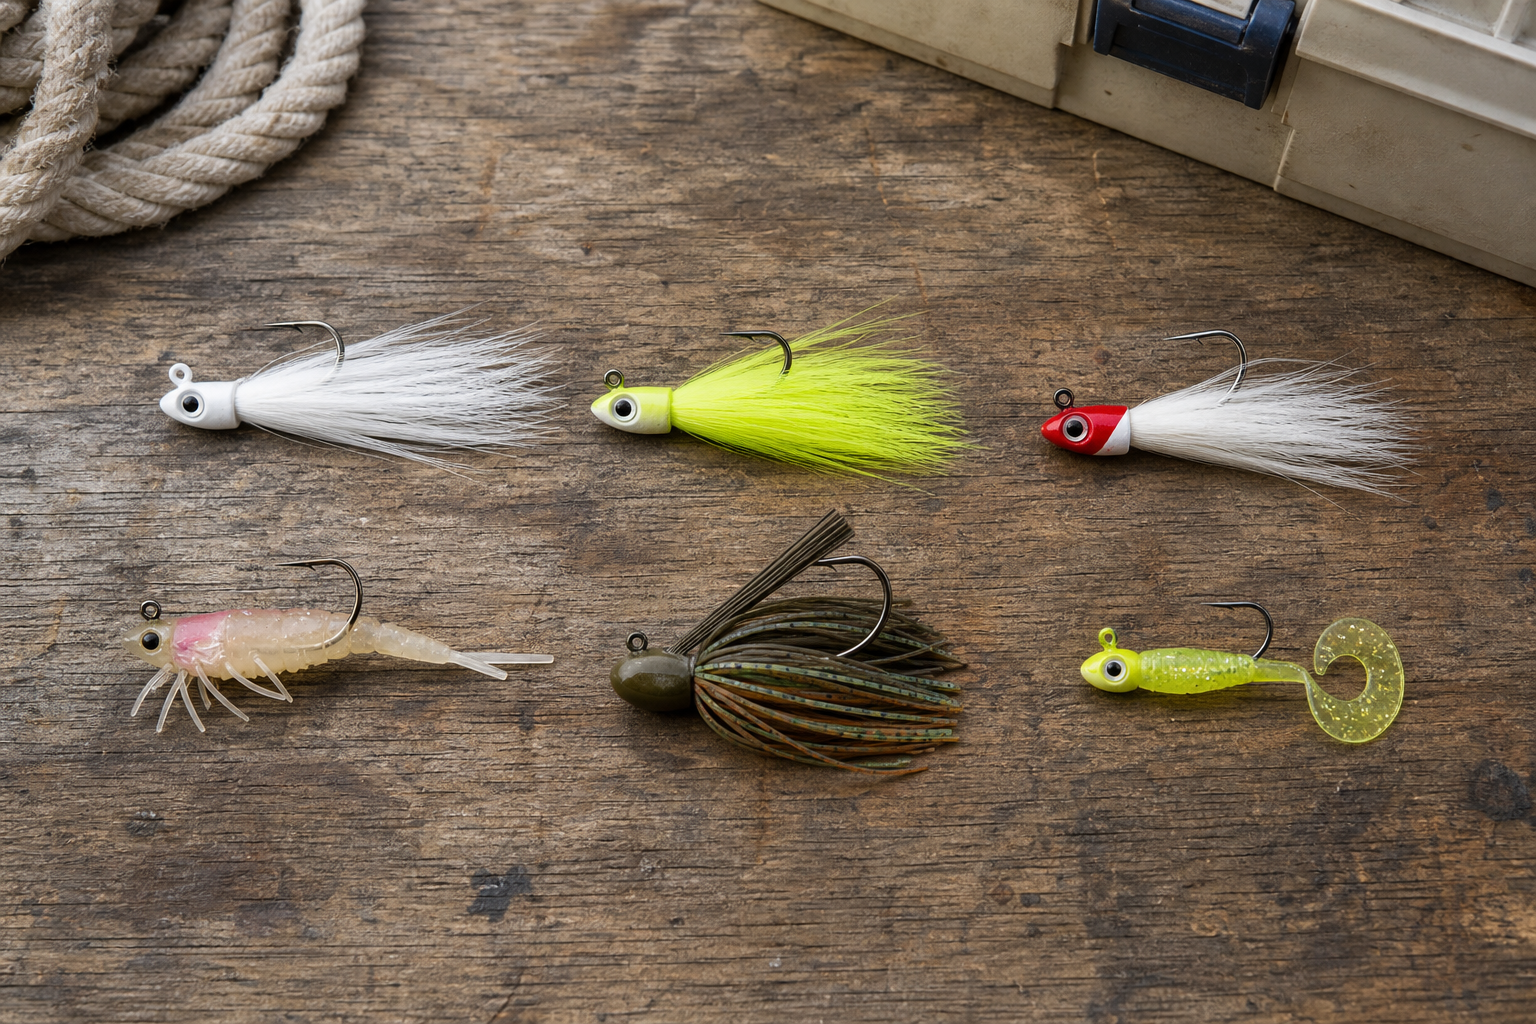
Photorealistic selection of bucktail, pompano, shrimp, bass, and crappie jigs on a wooden workbench
Saltwater staple

White Bucktail

Imitates a wide range of baitfish. Swim it for Spanish mackerel and cobia or bounce it for flounder and redfish.

Dirty water

Chartreuse Bucktail

High visibility helps around stained river water, deep inlets, and low-light conditions.

Beach casting

Pompano Jig

A small, fast-sinking jig for sight-casting or working inlet edges. Bounce it sharply, then pause.

Crustacean profile

Shrimp Jig

Fish slowly beneath docks, along creek mouths, and near bridge structure where live shrimp are common forage.

St. Johns cover

Weedless Swim Jig

Slides through eelgrass, pads, laydowns, and docks for largemouth bass. Add a compact swimbait trailer.

Light tackle

Crappie Jig

A 1/32–1/16 oz. marabou or soft-plastic jig catches speckled perch around brush and creek channels in cooler months.

Surf, Inlets, Jetties & ICW

Saltwater lures

Start with baitfish colors in clear water and brighter contrast in stained water or low light. Rinse every lure and hook with fresh water after use.

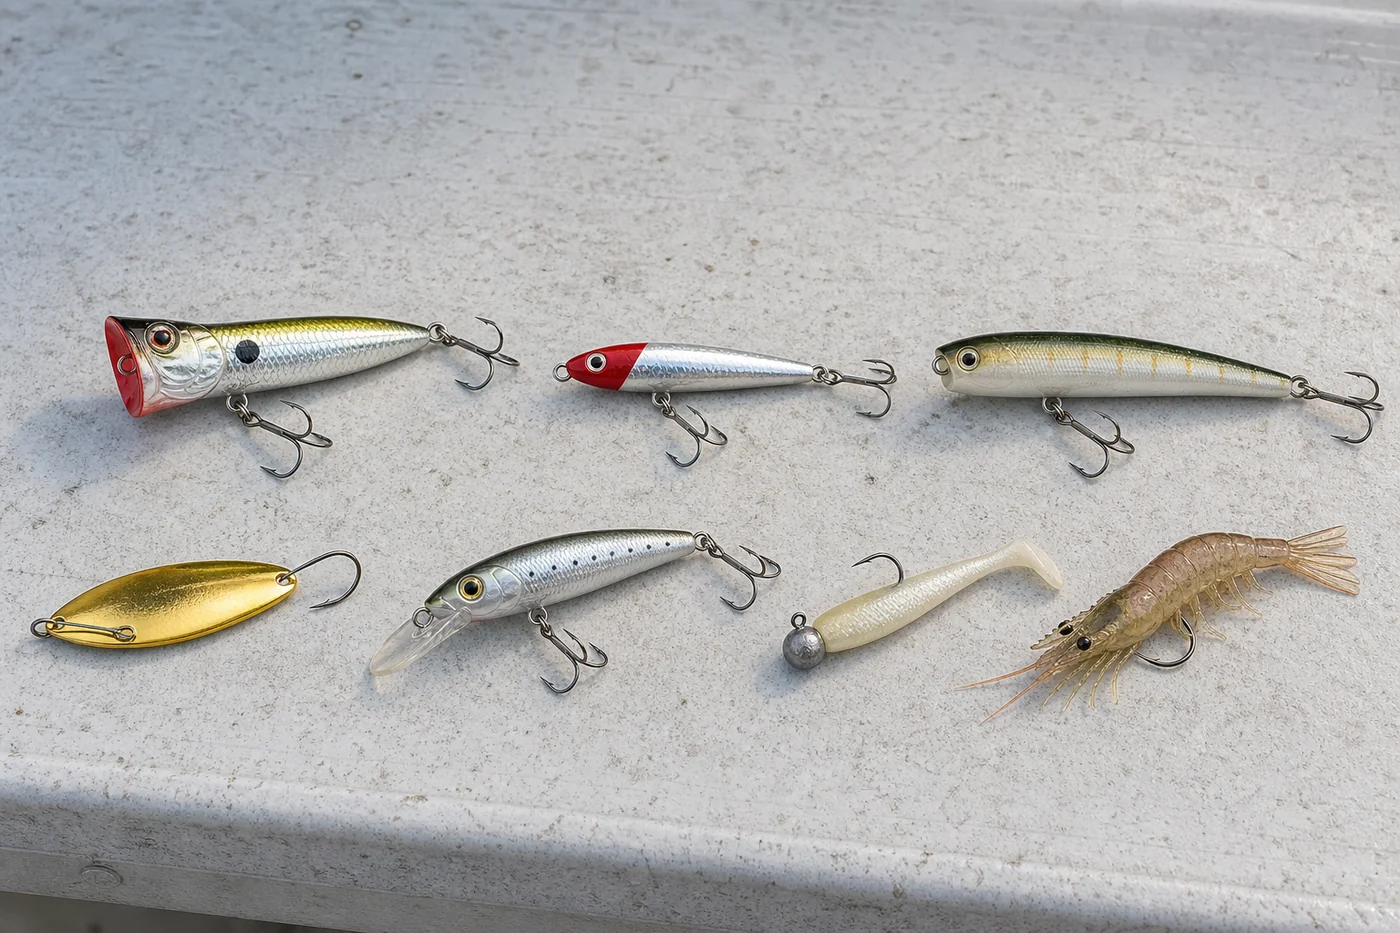
Photorealistic selection of saltwater popper, casting plug, walking topwater, spoon, diving plug, soft jerkbait, and shrimp lure
Surface commotion

Surface Popper

A cupped face spits water and calls jacks, bluefish, redfish, and seatrout upward. Pop it sharply with pauses around bait schools, inlet edges, seawalls, and points.

Fast metal casting plug

Gotcha Plug

This weighted plug casts far from beaches and piers. Retrieve quickly with short rod-tip snaps for Spanish mackerel, bluefish, jacks, and ladyfish.

Walk-the-dog lure

Walking Topwater

A side-to-side retrieve covers flats, creek mouths, and shoreline points for seatrout, redfish, snook, and bass. Pause when a fish follows or misses.

Flash and vibration

Gold Spoon

A weedless spoon works through grass, oyster edges, shallow creeks, and stained water for redfish, seatrout, flounder, and snook.

Subsurface hard bait

Diving Minnow Plug

Its diving lip reaches current seams, jetties, bridge shadows, and drop-offs for snook, seatrout, bluefish, redfish, and Spanish mackerel.

Weedless soft plastic

Soft Jerkbait

A weightless or lightly weighted jerk shad darts through grass and skips beneath docks. Twitch twice, then let it glide and sink.

Crustacean imitation

Artificial Shrimp

Fish it under a popping cork, on a jig head, or slowly without added weight around docks, grass edges, creek mouths, and bridge structure.

St. Johns River, Creeks, Lakes & Ponds

Freshwater lures

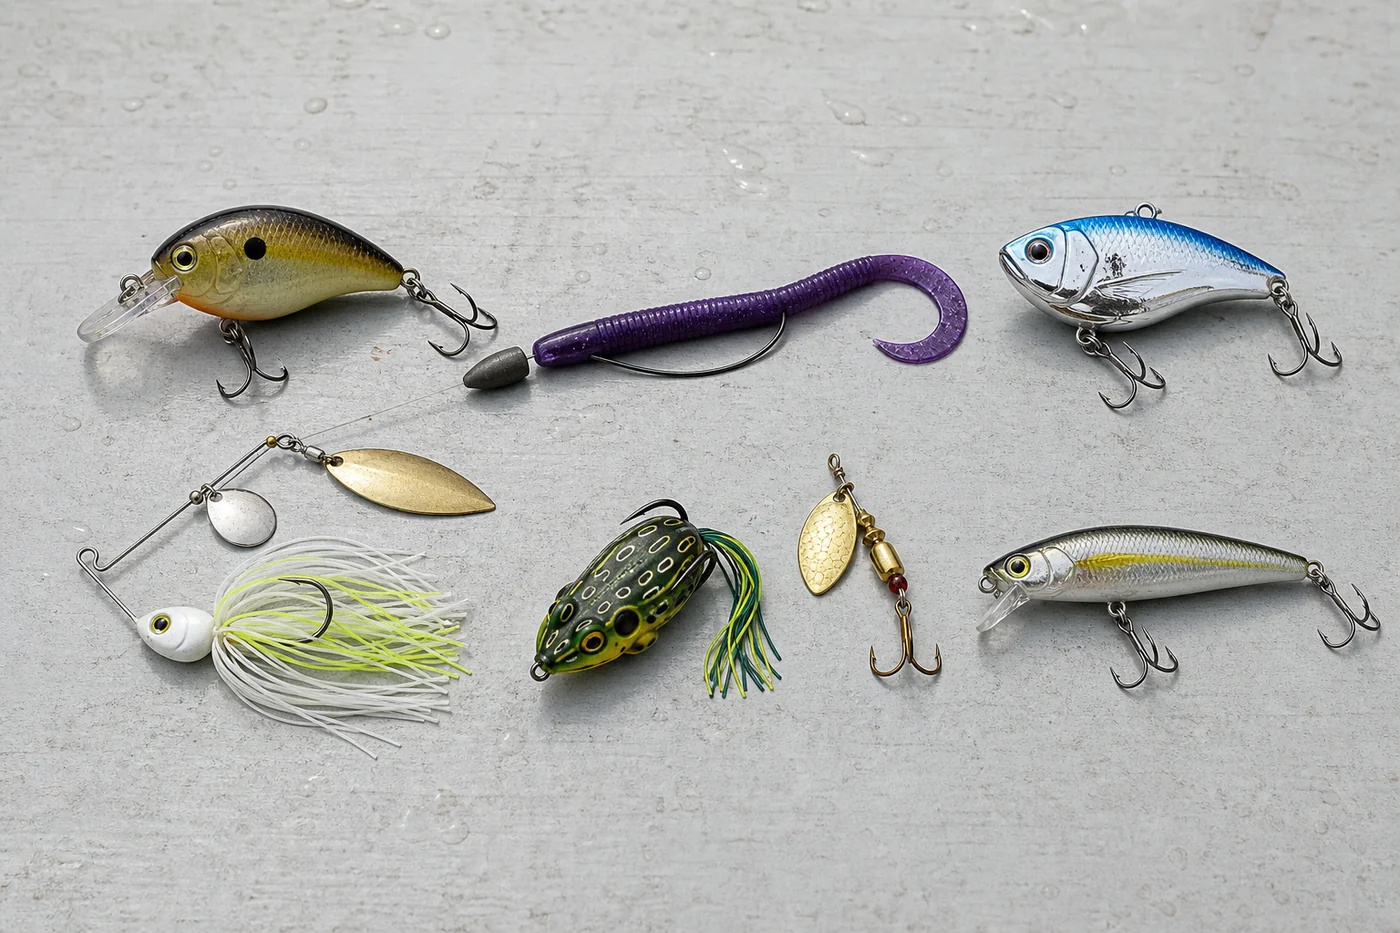
Use moving lures to locate active fish, then slow down with worms, frogs, and jigs when bass hold tightly to cover.

Photorealistic selection of freshwater crankbait, artificial worm, rattle bait, spinnerbait, frog, inline spinner, and jerkbait
Shallow deflection bait

Square-Bill Crankbait

Its wide lip makes it hunt and deflect from wood, riprap, dock posts, and shallow cover. Pause after contact to imitate a stunned baitfish.

Slow cover bait

Artificial Worm

A Texas-rigged worm slips through pads, eelgrass, brush, and docks. Let it fall, lift gently, and watch the line for movement.

Vibration search bait

Lipless Rattle Bait

This sinking lure covers flats and channels quickly. Retrieve steadily, yo-yo it over deep water, or rip it free from submerged grass.

Flash around cover

Spinnerbait

Spinning blades flash and thump while the single hook moves through wood and vegetation, especially in stained, windy, or rising water.

Heavy-cover topwater

Hollow-Body Frog

A soft weedless frog crosses lily pads, hydrilla mats, flooded grass, and shaded banks. Pause after the strike before setting the hook.

Compact multi-species lure

Inline Spinner

A small rotating blade catches bluegill, crappie, bass, and pickerel in creek pools, canal edges, and open pockets near vegetation.

Cool-water minnow bait

Suspending Jerkbait

Sharp twitches make it dart before hanging nearly motionless. Use shorter twitches and longer pauses in cool or clear water.

Reefs, Wrecks & Bait Pods

Nearshore and offshore rigs

Use heavier tackle carefully—leader and hook strength should match the fish without overpowering the presentation.

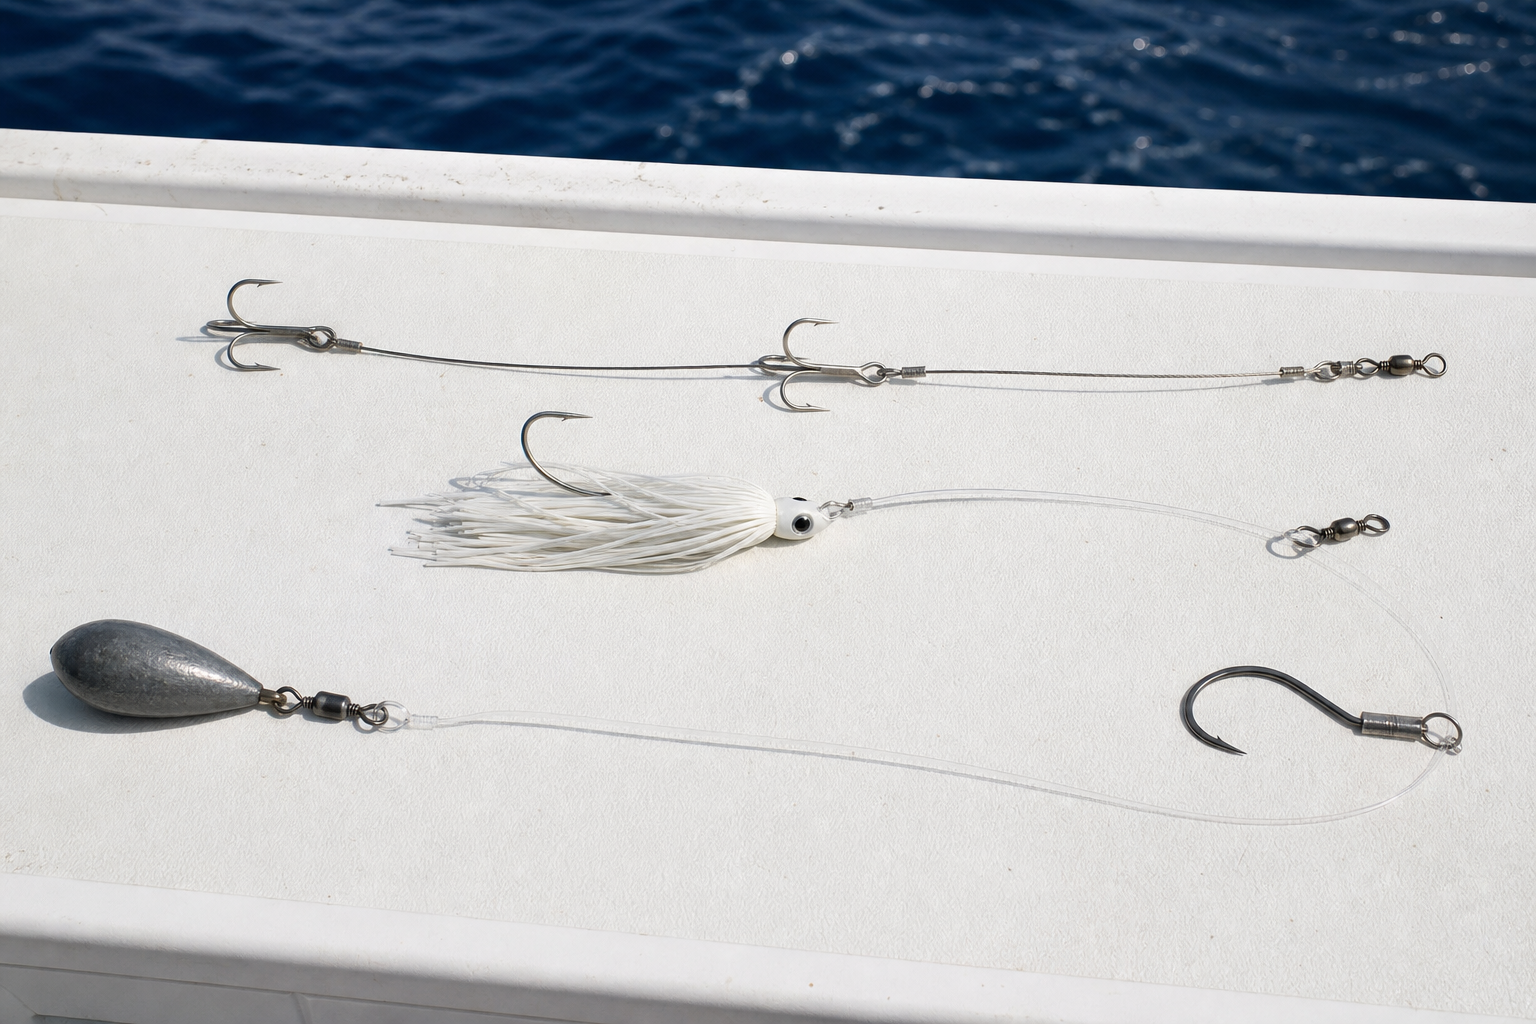
Photorealistic king mackerel stinger rig, cobia bucktail, and offshore bottom rig on a boat table
Slow trolling

King Mackerel Stinger Rig

A light wire leader with a nose hook and trailing stinger hook protects against sharp teeth while keeping a live bait swimming naturally.

Targets
King and Spanish mackerel
Build
Light wire, lead hook, trailing treble
Tip
Place the stinger lightly near the bait’s tail.
Sight casting

Cobia Bucktail

A stout 1–3 oz. bucktail presents a compact target near rays, buoys, and surface-cruising fish. White, chartreuse, and natural colors are dependable.

Targets
Cobia, amberjack
Build
Heavy hook, strong leader, full skirt
Tip
Cast ahead and retrieve across the fish’s path.
Reef bottom rig

Single-Hook Bottom Rig

A simple leader, circle hook, and bank sinker reaches reefs and wrecks with fewer tangles than a multi-hook rig.

Targets
Snapper, black sea bass, triggerfish
Build
Swivel, abrasion-resistant leader, circle hook, sinker
Tip
Lower under control and reel away from structure after the bite.

Essential Connections

Fishing knots

Practice at home, wet the line before tightening, and trim clean. A good knot beats expensive tackle every time.

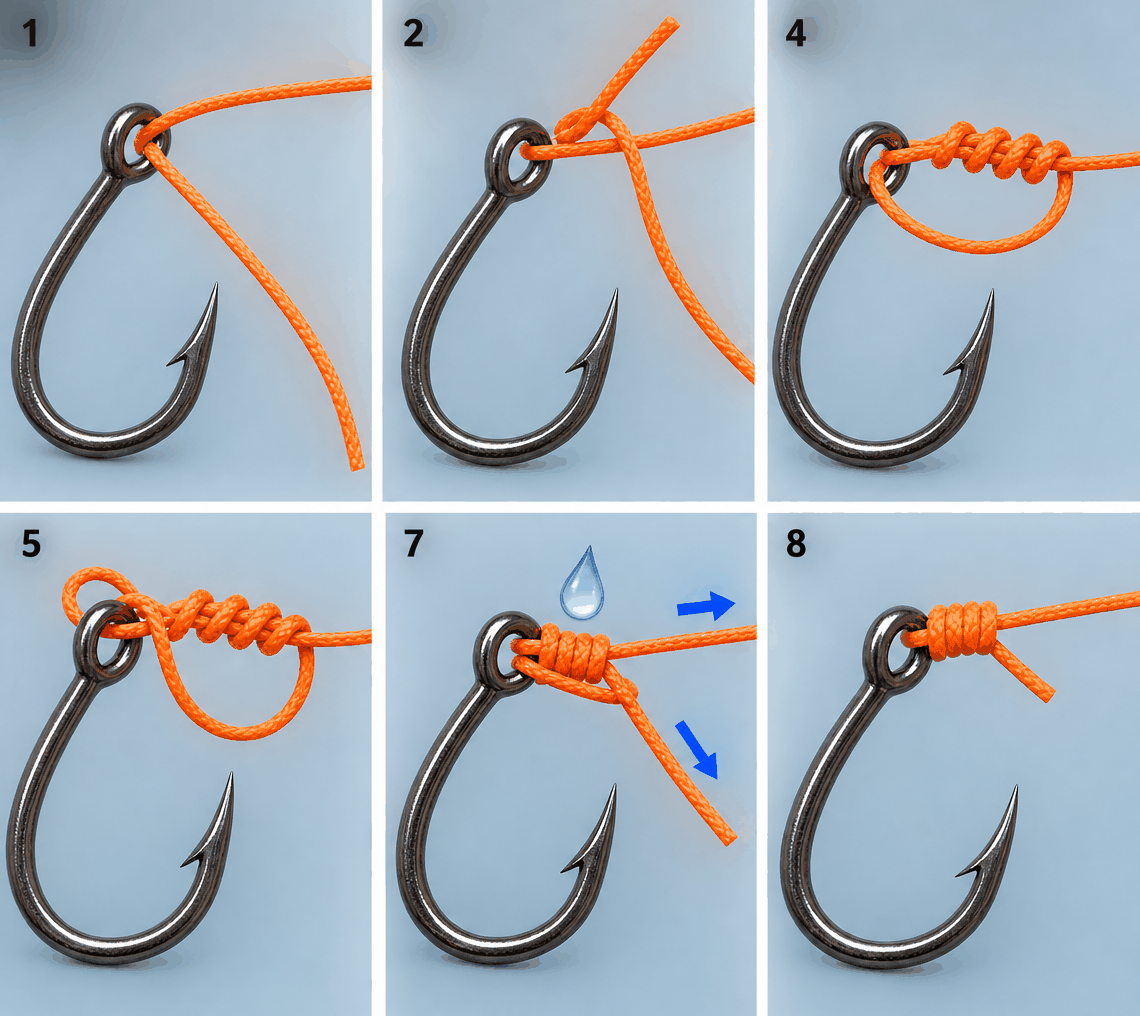
Improved Clinch Knot

Great for tying mono or fluoro to hooks, swivels, and smaller lures. Use the controls to watch it come together.

Improved clinch knot diagram hook eye 5–7 wraps
Step 1 of 6 Pass the tag end through the hook eye.

Step-by-step

  1. Run 6 to 8 inches of tag end through the hook eye.
  2. Hold the hook and standing line, then wrap the tag end around the standing line 5 to 7 times.
  3. Pass the tag end through the small loop right above the hook eye.
  4. Pass the tag end back through the larger loop created by step 3.
  5. Wet the knot, pull the standing line until the coils stack neatly, then snug the tag end.
  6. Trim the tag close, leaving a tiny safety nub.

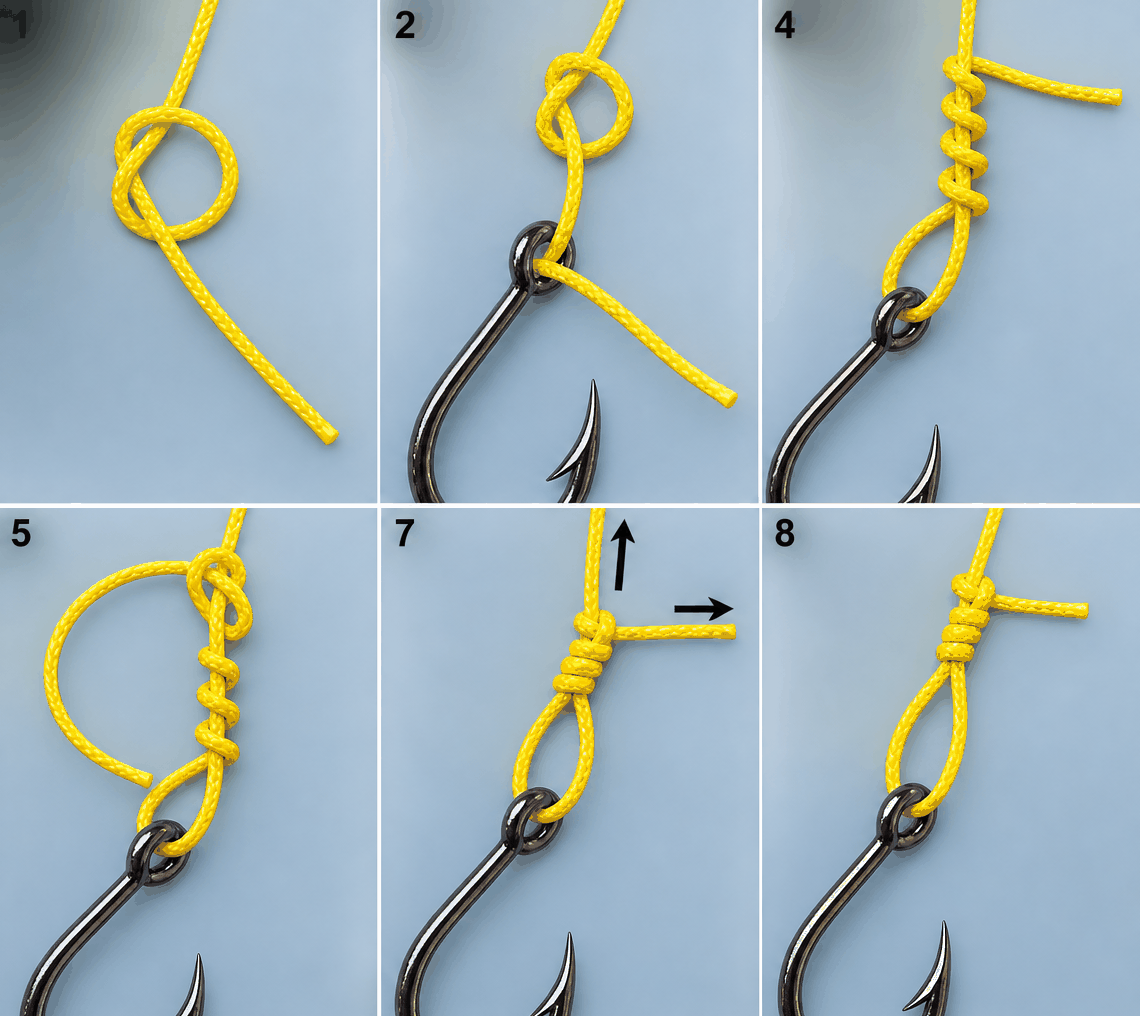
Loop Knot

Good for giving topwaters, soft plastics, and plugs more natural action.

Non-slip loop knot diagram standing line free loop

Step-by-step

  1. Tie a loose overhand knot 4 to 6 inches above the tag end.
  2. Run the tag end through the lure or hook eye.
  3. Pass the tag end back through the overhand knot from the same side it exited.
  4. Wrap the tag end around the standing line 3 to 4 times.
  5. Run the tag end back through the overhand knot again.
  6. Wet the knot, set the loop size, pull the wraps tight, and trim.

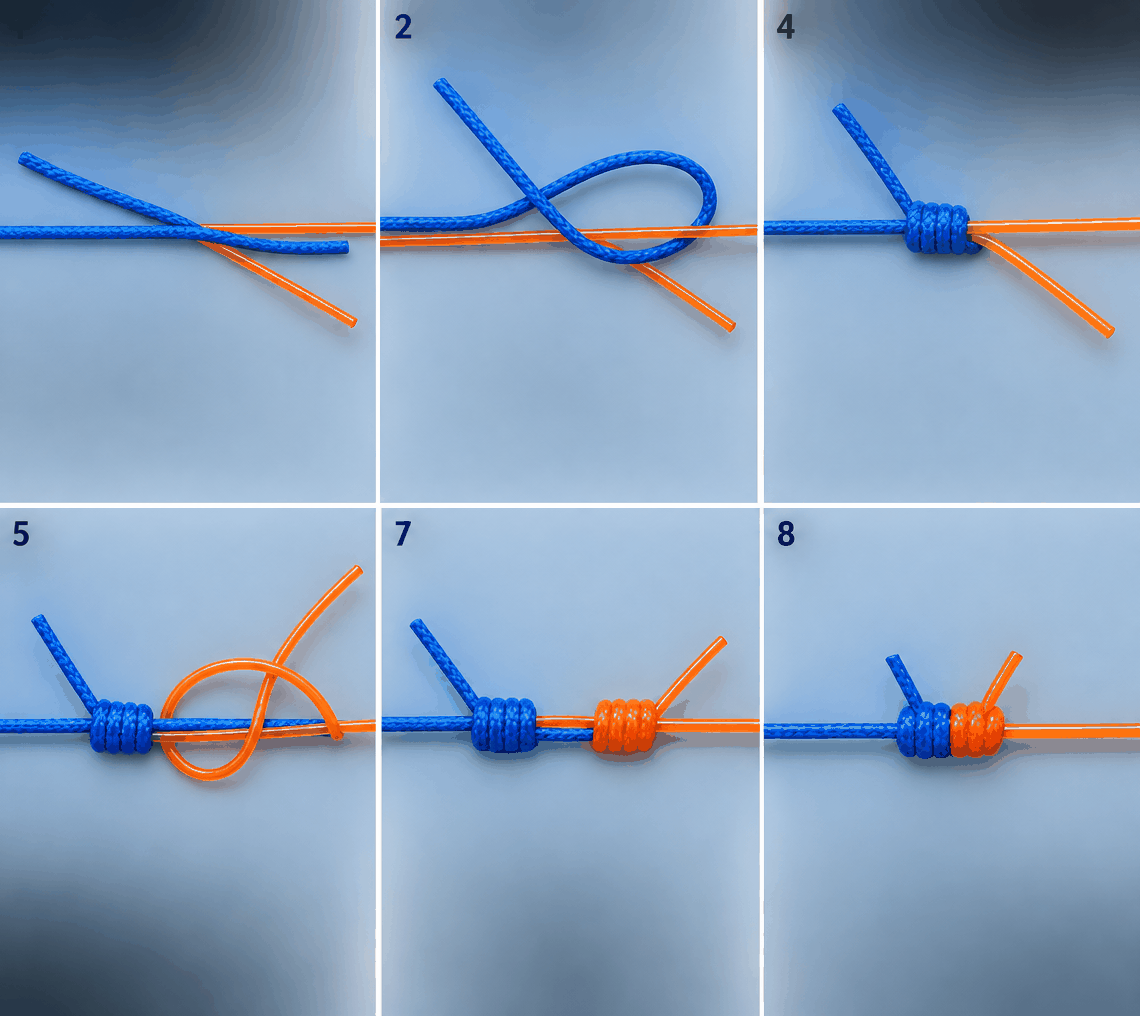
Double Uni Knot

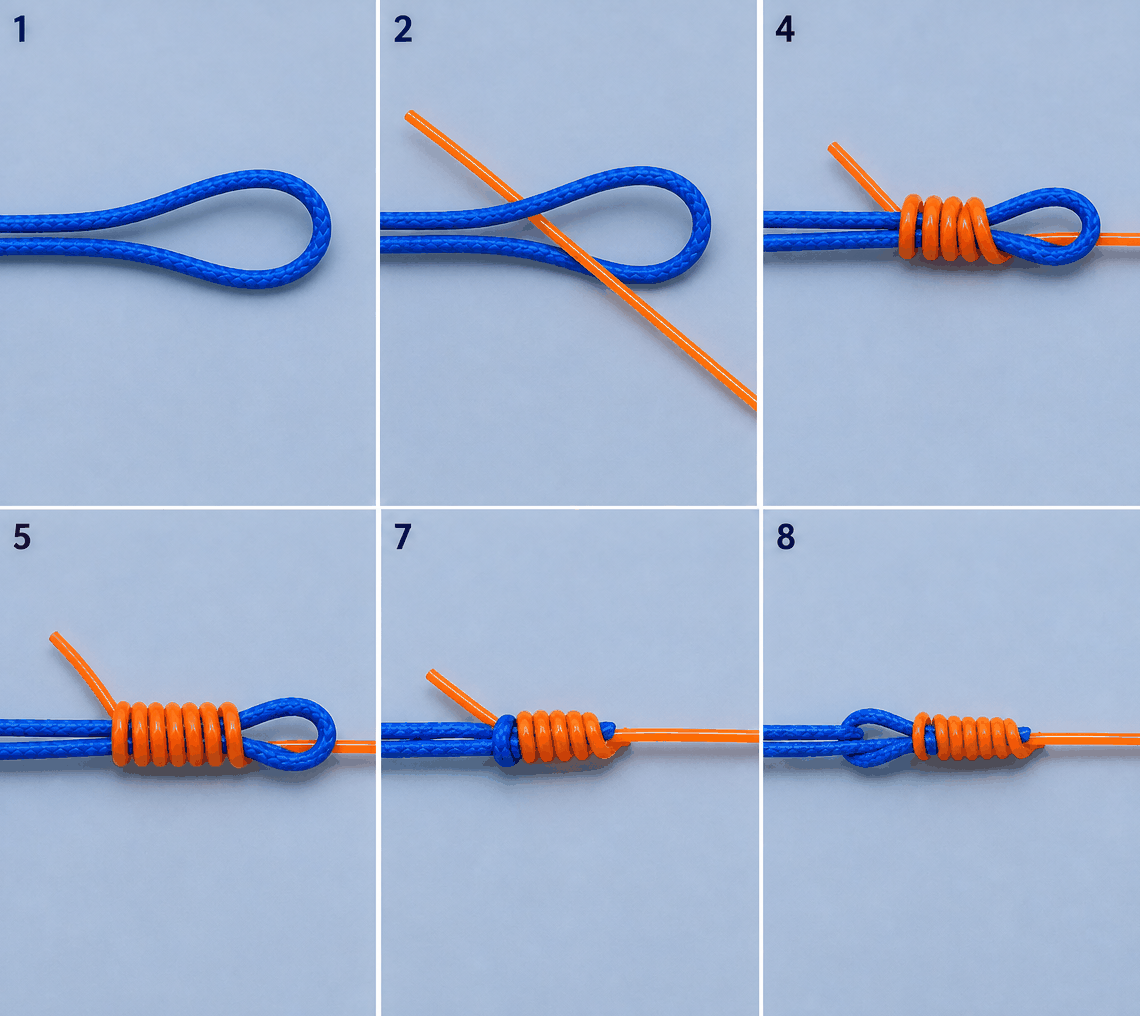
A reliable braid-to-leader knot when you want something simple and repeatable.

Double uni knot diagram braid leader

Step-by-step

  1. Overlap the braid and leader by 8 to 10 inches.
  2. With the leader tag, form a loop over both lines.
  3. Wrap the leader tag through that loop 4 to 5 times, then snug it lightly.
  4. With the braid tag, form a second loop over both lines.
  5. Wrap the braid tag through its loop 6 to 8 times, then snug it lightly.
  6. Wet both knots and pull the standing lines apart until the knots slide together.
  7. Trim both tag ends close.

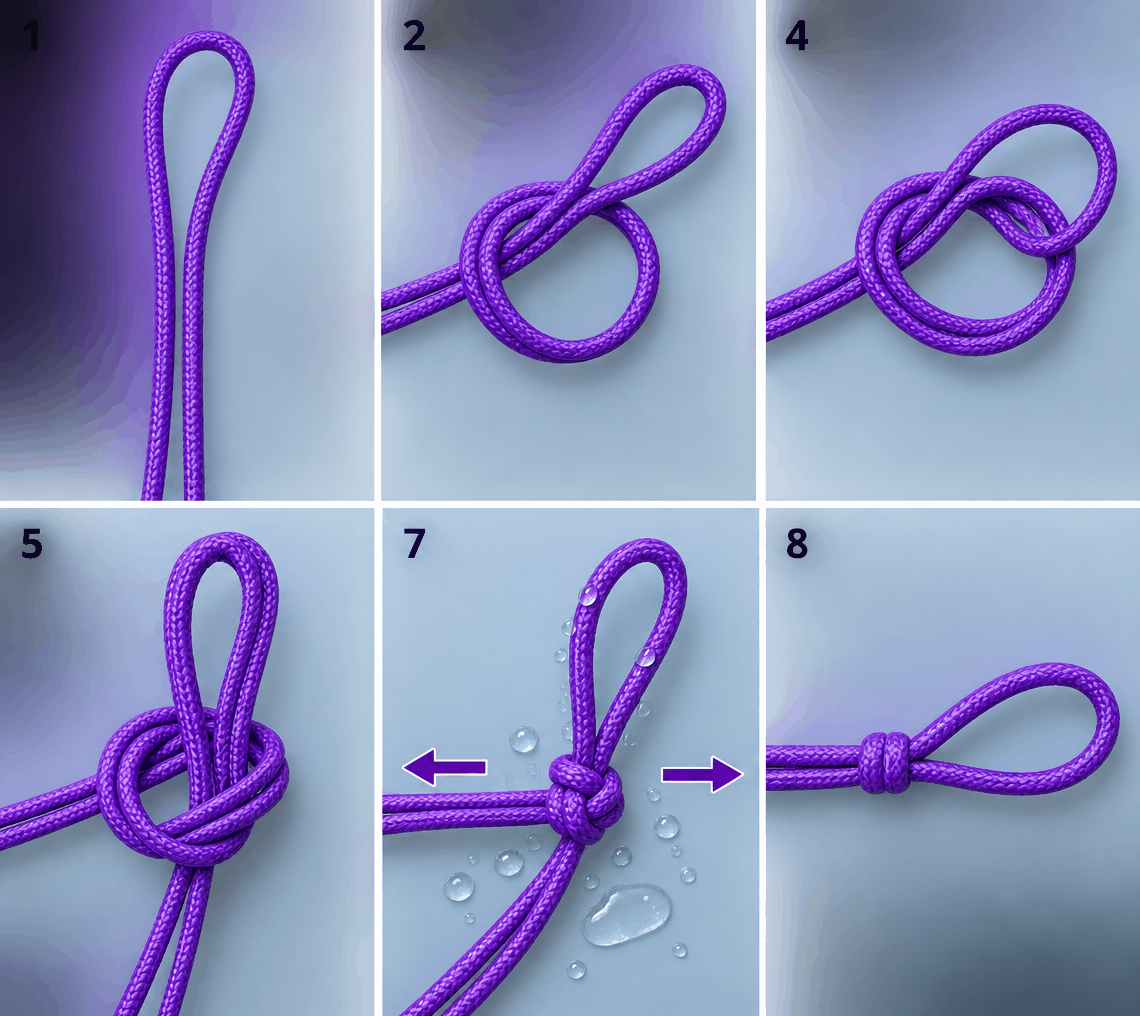
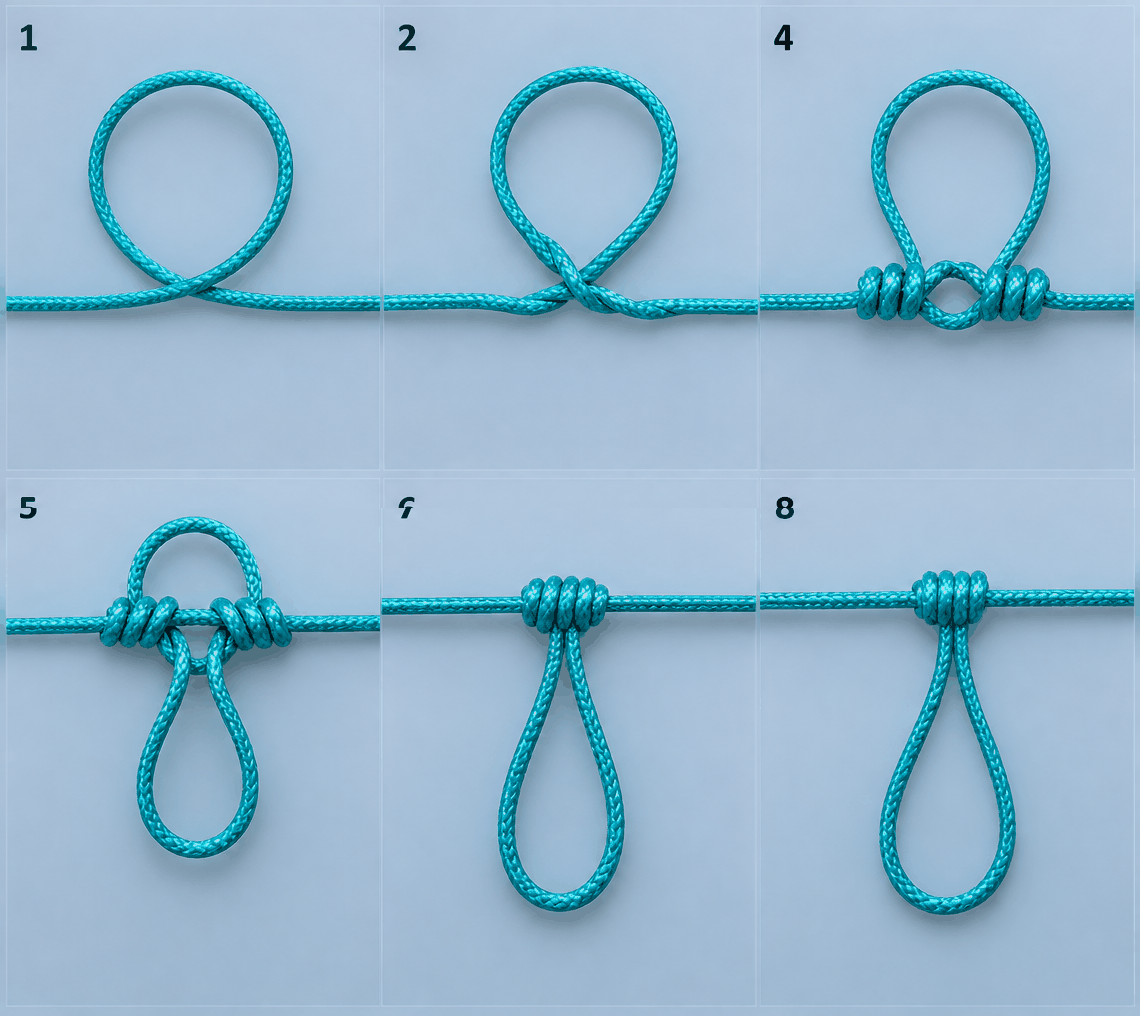
Surgeon's Loop

Fast loop for bottom rigs, dropper setups, or leader loops.

Surgeon's loop knot diagram doubled line finished loop

Step-by-step

  1. Double the line to form the loop size you want.
  2. Use the doubled line to tie a loose overhand knot.
  3. Pass the loop through that overhand knot a second time.
  4. Wet the knot so both strands can seat evenly.
  5. Pull the loop and both standing strands at the same time until the knot cinches down.
  6. Trim the tag end.

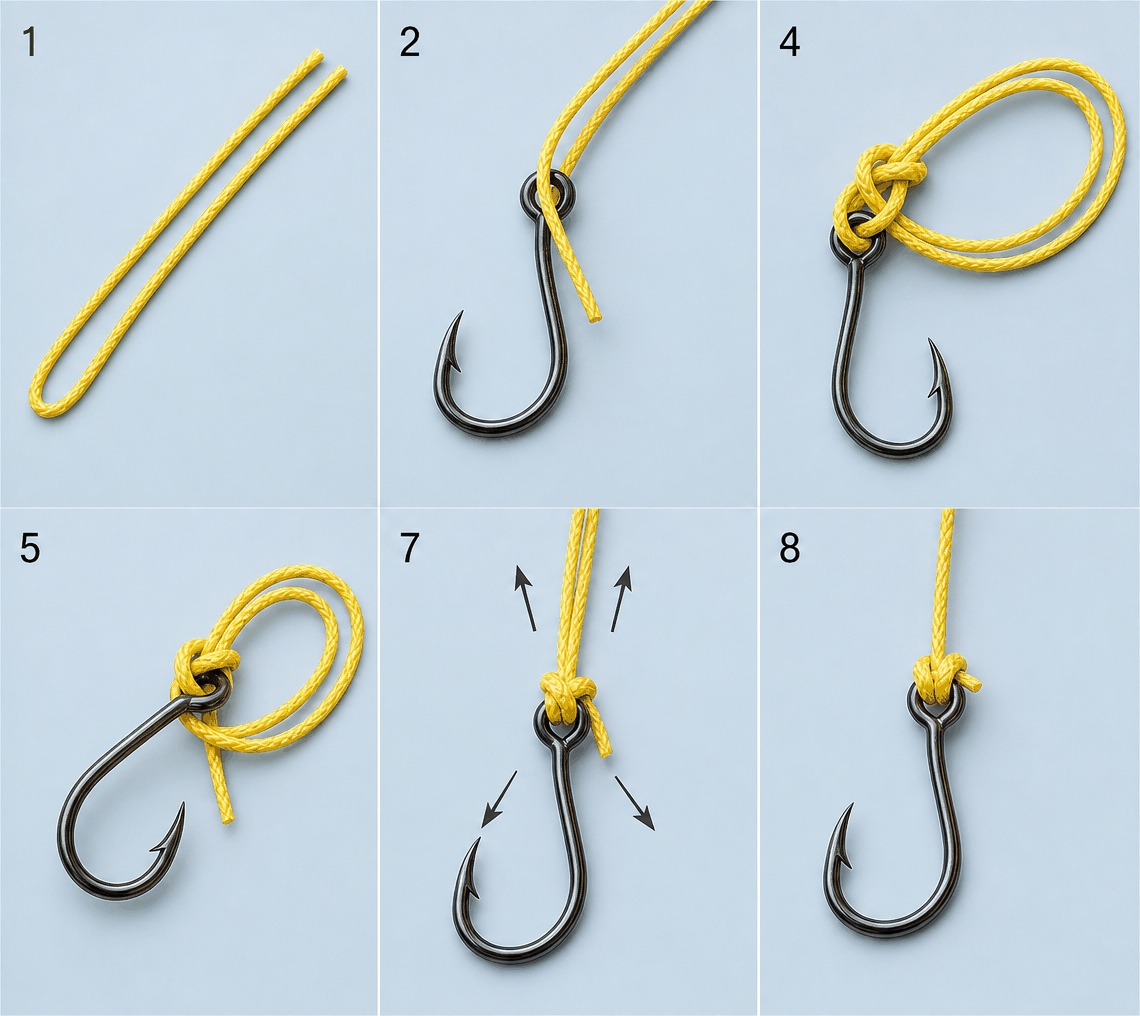
Palomar Knot

One of the strongest and easiest knots for braid, hooks, jig heads, and swivels.

Palomar knot diagram doubled line pass loop over hook

Step-by-step

  1. Double 6 to 8 inches of line and pass the doubled loop through the hook or swivel eye.
  2. Tie a loose overhand knot with the doubled line, keeping the hook hanging below.
  3. Pass the doubled loop over the hook, lure, or swivel.
  4. Wet the knot and pull both the standing line and tag together until it seats.
  5. Pull the standing line firmly, then trim the tag end.

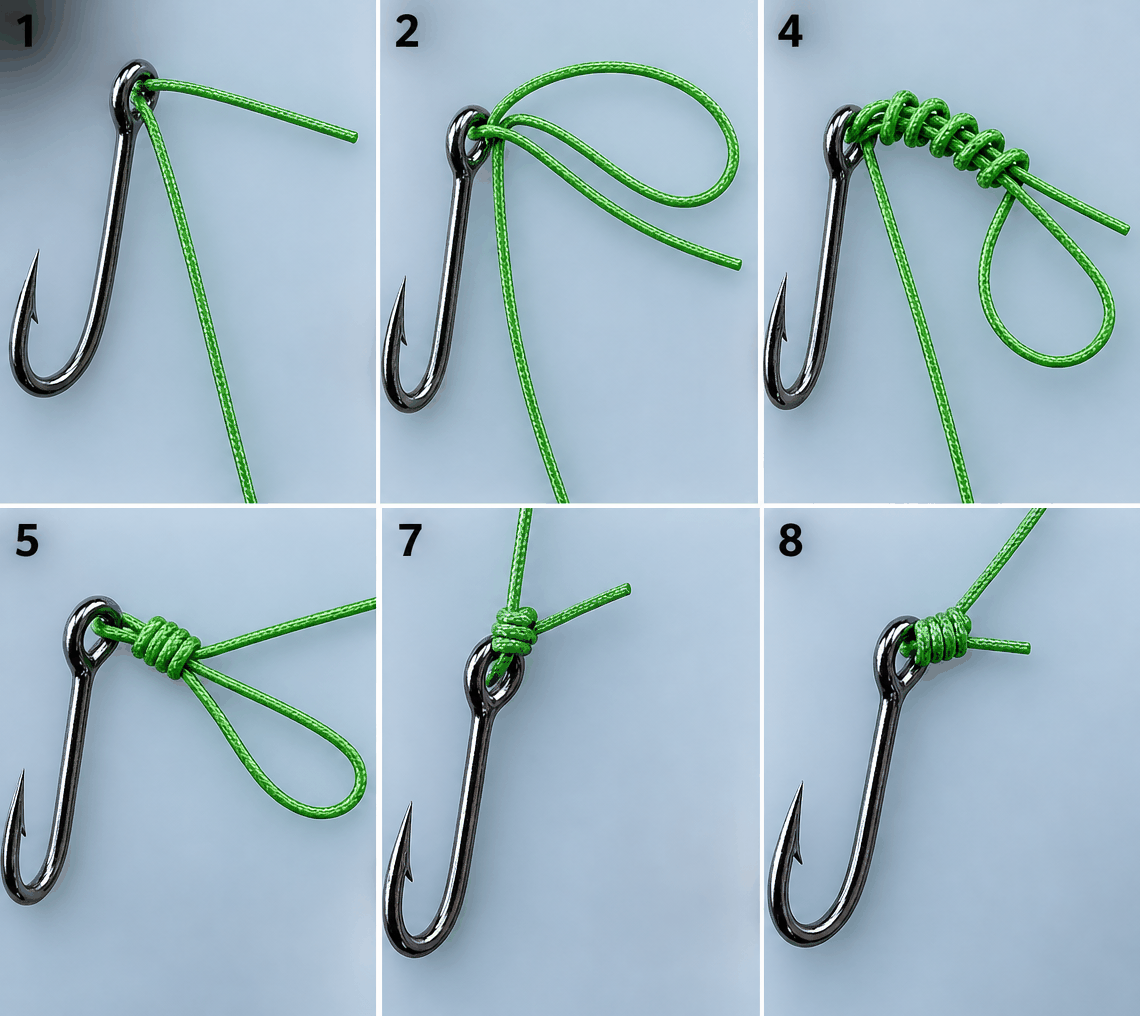
Uni Knot

A dependable all-purpose knot for hooks, lures, swivels, and light leader work.

Uni knot diagram standing line wrap tag through loop

Step-by-step

  1. Run the tag end through the eye and lay it alongside the standing line.
  2. Make a loop with the tag end over both lines.
  3. Wrap the tag through the loop and around both lines 5 to 7 times.
  4. Wet the wraps and pull the tag to snug the knot.
  5. Slide the knot down to the eye with steady pressure on the standing line.
  6. Pull tight and trim the tag.

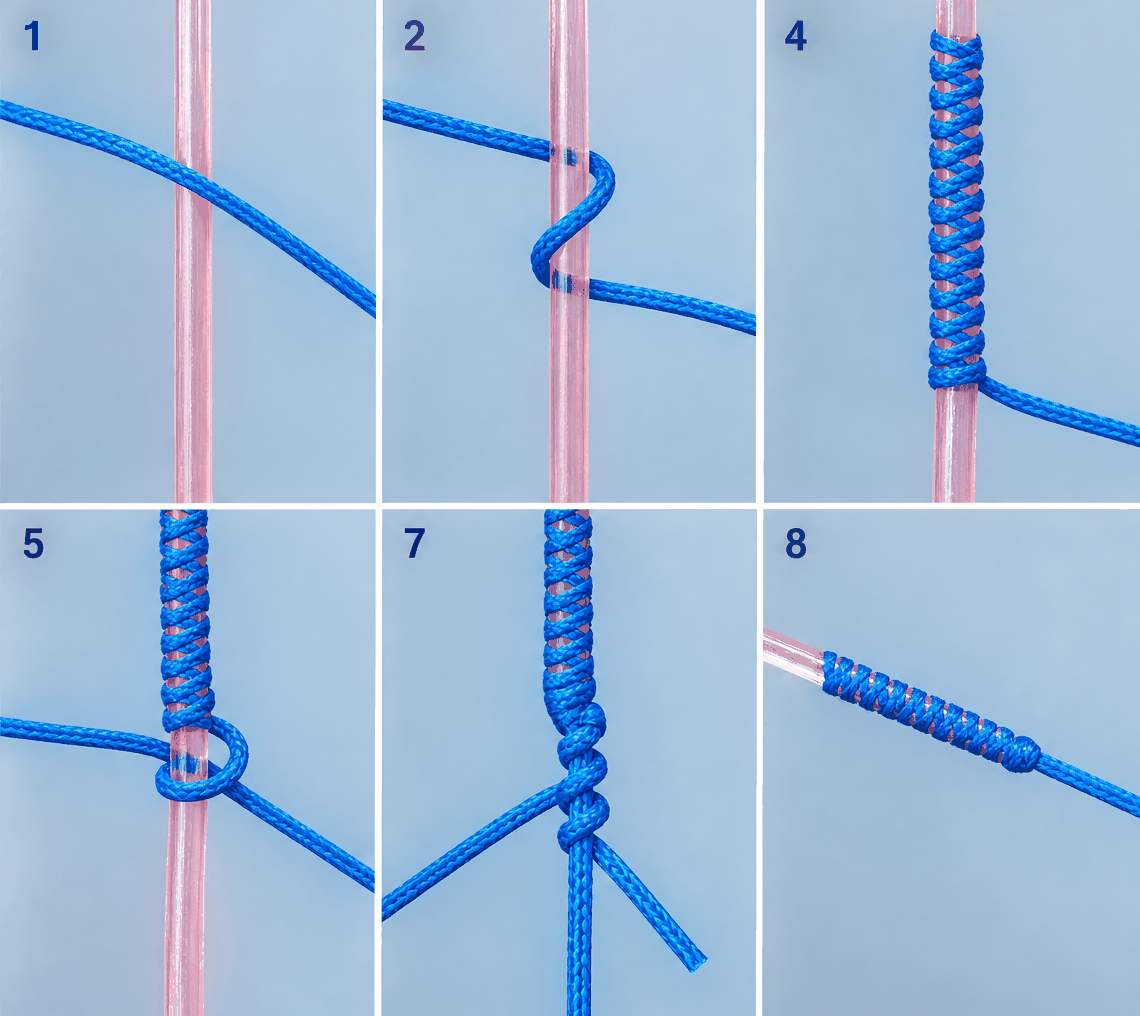
FG Knot

A slim braid-to-leader connection that casts cleanly through guides for plugs and long leaders.

FG knot diagram braid wraps bite leader finish with half hitches

Step-by-step

  1. Keep the leader tight and lay the braid across it under tension.
  2. Wrap the braid over and under the leader, alternating sides 16 to 22 times.
  3. Pull the braid and leader hard so the wraps bite into the leader.
  4. Tie two half hitches around both lines to lock the wraps.
  5. Trim the leader tag close, then add 3 to 5 more half hitches on the braid.
  6. Pull-test before fishing; the knot should be slim and smooth.

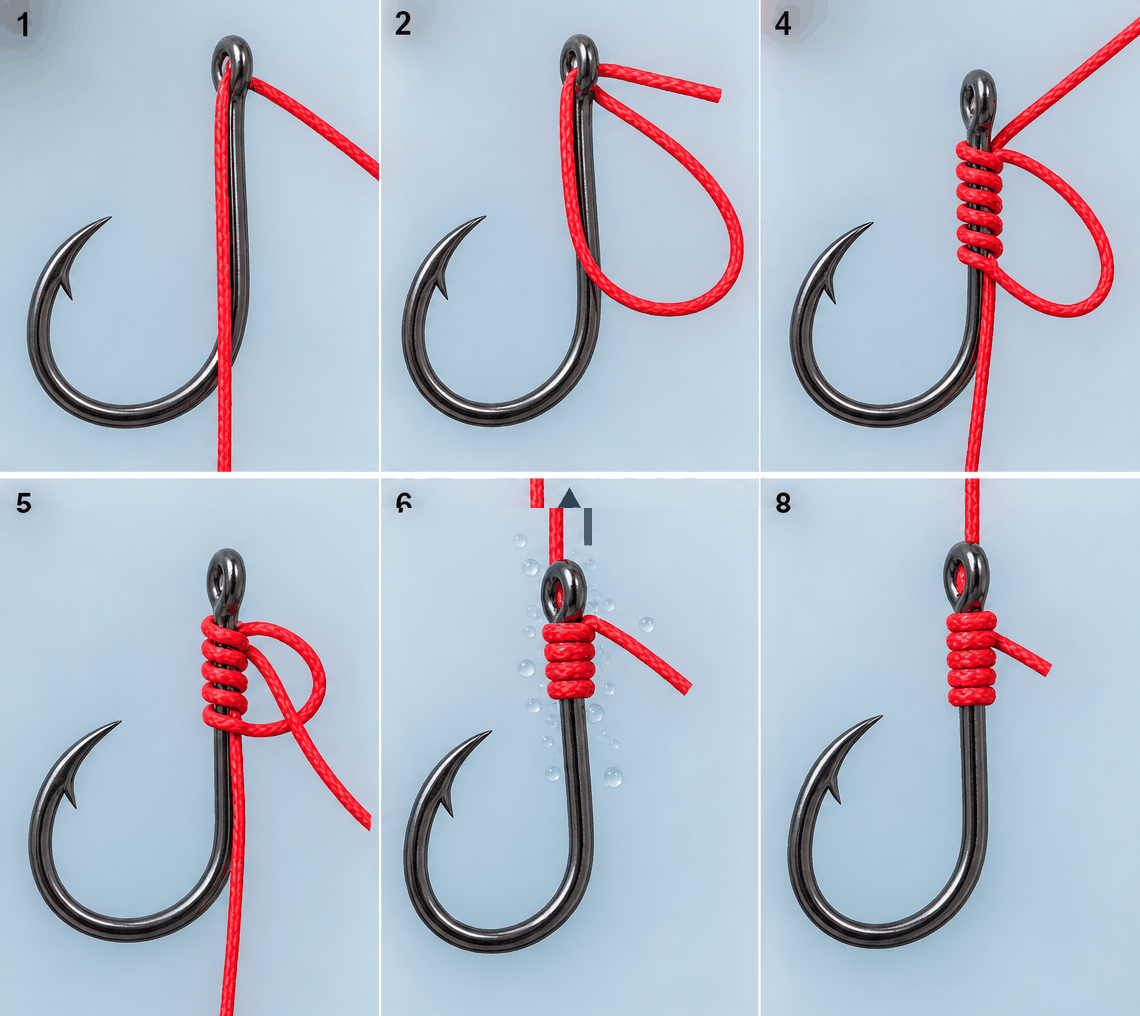
Snell Knot

Excellent for live bait hooks, circle hooks, and rigs where a straight pull helps hooksets.

Snell knot diagram line exits toward hook point wrap shank

Step-by-step

  1. Pass the leader through the hook eye from point side toward the shank.
  2. Lay the tag end along the hook shank, forming a small loop near the eye.
  3. Wrap the tag around the shank and both lines 5 to 7 times.
  4. Pass the tag end back through the loop near the eye.
  5. Wet the knot and pull the standing line until the wraps seat tight on the shank.
  6. Trim the tag end close.

Dropper Loop

Useful for pompano rigs, bait rigs, and adding a loop that stands away from the main line.

Dropper loop knot diagram main line bait loop

Step-by-step

  1. Form a loop in the line where you want the dropper to sit.
  2. Twist the loop around the standing line 5 to 7 times, leaving the center opening clear.
  3. Push the loop through the center opening.
  4. Wet the knot and pull both standing lines evenly.
  5. Pull the loop last so it stands out cleanly from the main line.
  6. Attach the hook or leader loop-to-loop.

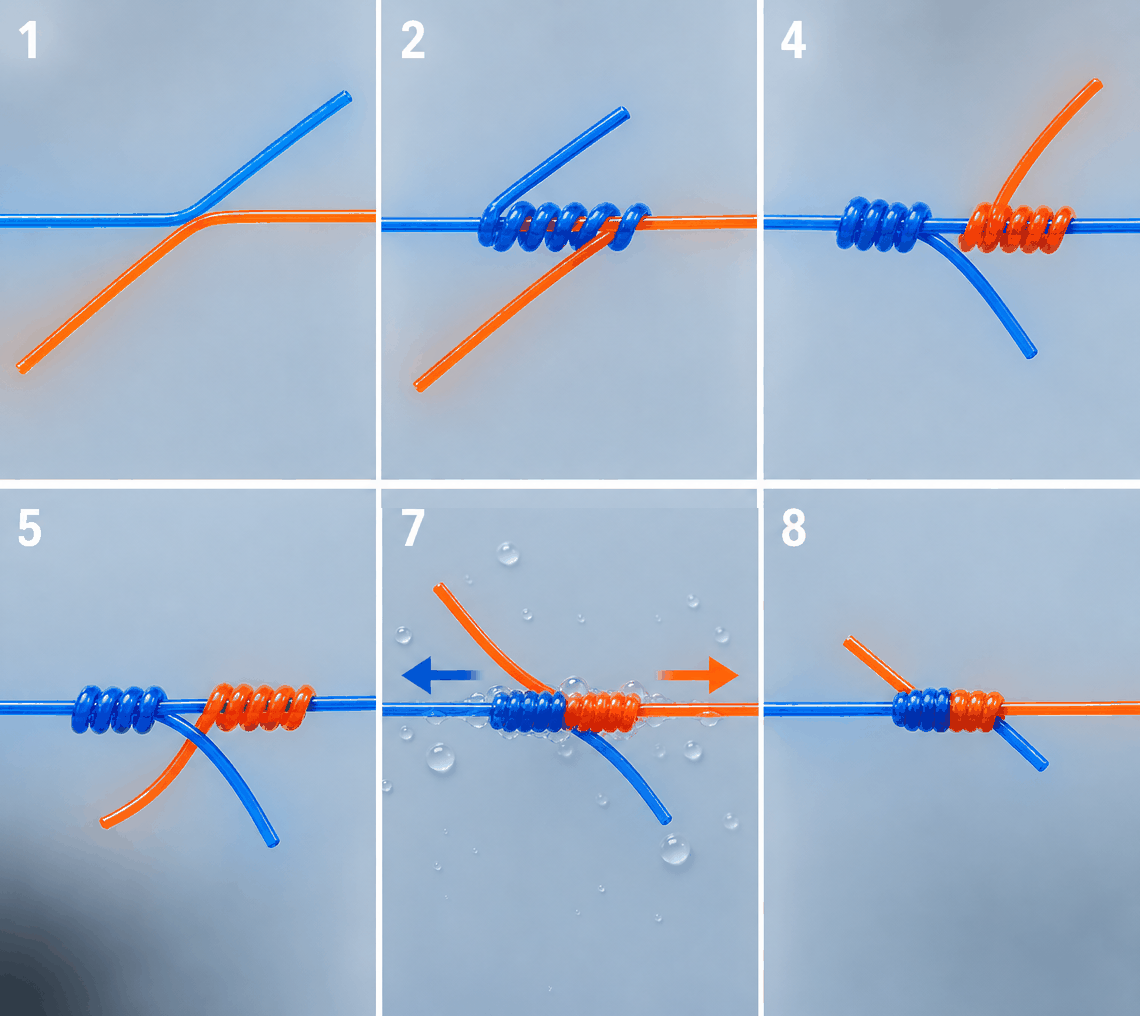
Blood Knot

A clean mono-to-fluoro or leader-to-leader knot when the two line sizes are close.

Blood knot diagram wrap one tag wrap the other

Step-by-step

  1. Overlap the two line ends by 6 to 8 inches.
  2. Wrap one tag end around the opposite standing line 5 times.
  3. Bring that tag back through the center gap between the two lines.
  4. Wrap the other tag end around the opposite standing line 5 times.
  5. Bring the second tag through the center gap from the opposite direction.
  6. Wet the knot and pull both standing lines until the wraps draw together.
  7. Trim both tag ends close.
Desktop site